Part 3: Running OVSDB between Juniper QFX5100 and VMware NSX for vCenter
The following components were used for this example:
- VMware NSX for vSphere 6.2.0 Build 2986609
- Juniper QFX5100, Junos 14.1X53-D27.3, SDN Package Version 14.1X53-D26.2
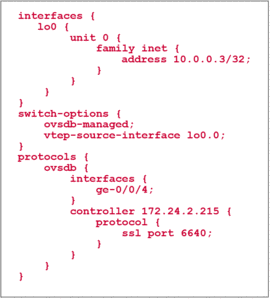
The very first step on the QFX5100 is to configure it to run OVSDB and establish a communication channel to the NSX controller. In the example, the NSX controller is having the IP address 172.24.2.215.
The Loopback interface is configured as vtep-source interface. This means that any packet that gets encapsulated by VXLAN is using 10.0.0.3 as source IP address. The destination address is the VTEP IP address of the destination hypervisor or ToR Switch.Additionally, we instruct the switch which interfaces should be controlled by the NSX controller from now on. In this example we use ge-0/0/4. There should be no configuration on the interface.
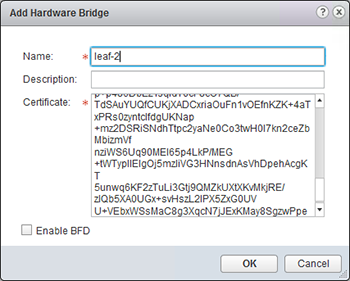
In the vSphere Web Client we go to „Network and Security“ => „Service Definitions“ => „Hardware Devices“ and click the green „+“ to add a new device. A hardware switch is identified by a name and a certificate which needs to be entered as shown below:
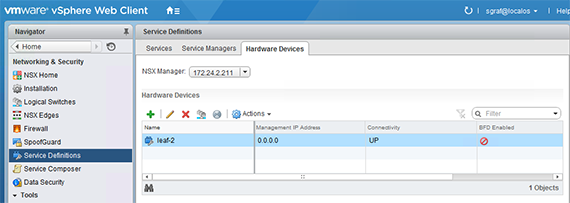
The certificate needs to be installed on the switch before contacting the NSX controller. The NSX controller uses the certificate to identify incoming connections for the exchange of OVSDB information. After adding the device, a new entry shows up in the vSphere Client showing that the session is established.
On the Juniper Switch we can verify the control-session with a simple command.
Attaching Hardware ports to logical switches
Hardware ports can be attached in vSphere Web Client with „Networking and Security“ at the following places:
- Service-Definitions => Hardware Devices => right-click on device => Attach Logical Switch
- Logical Switches => right-click on logical switch => Attach Hardware Port
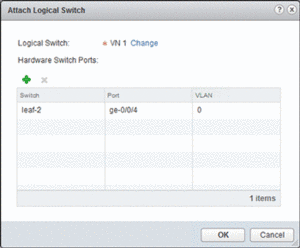
Within NSX, Virtual Networks (VNs) are referred to as logical switches. In this case we have a logical switch called “VN 1” that we link to the hardware device and the physical port that should be attached as shown below.
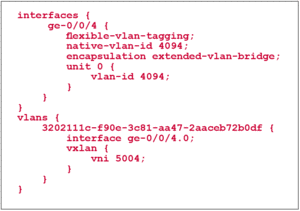
NSX will only show available ports that have been enabled for OVSDB, in our case ge-0/0/4. After confirming the change, the following configuration will automatically become active on the QFX5100 for an untagged port.
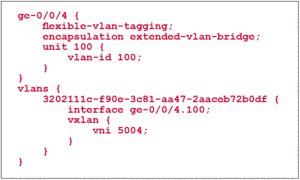
If a port is tagged with a VLAN-ID of 100 on the NSX controller, the following configuration would be seen on the QFX5100:
The Juniper Switch performs the configuration of the VXLAN and interface automatically based on the information received via OVSDB from the NSX Controller. The name of the VLAN is actually the identifier of the logical switch in the NSX database. In order to check the status of the configured VXLAN the following command can be used.
A successful configuration on both sides of the OVSDB exchange can be confirmed by the flag „Created by both“. Additionally, the MAC table of this virtual network can be seen on the QFX Switch.
The IP Address 10.0.0.3 is the loopback of the QFX5100 switch that is used as tunnel source address. The address 172.24.242.50 is the address of an ESXi hypervisor which is hosting a virtual machine which is part of the same logical network.
When capturing a live communication between the virtual machine 00:50:56:ad:02:32 located on hypervisor 172.24.242.50 and the physical host 2c:6b:f5:7d:49:f7 which is a connected on the QFX switch, we can see how the overlay network works in practice.
The outer IP header shown in line three has been used by user datacenter network to forward the packet. We can see that the addresses here are actually the same that were shown in the command above as VTEP addresses.
Following the IP header we can see the VXLAN header with a VNI of 5004. The VNI is associated to a virtual network, as soon as it is created in NSX. The QFX5100 switch got this piece of information from the NSX controller via OVSDB when we associated the physical port with the virtual network. This field is used on the egress hypervisor / ToR Switch to match the packet into a certain virtual network.
In the following lines we finally can see the actual MAC addresses of the devices that were part of our example.
Share your opinion with us!
Your perspective counts! Leave a comment on our blog article and let us know what you think.
.png?width=300&height=300&name=Design%20ohne%20Titel%20(7).png)
